Elizabeth Moss stitch Granny Square Free Pattern | Granny Stitch Sampler CAL
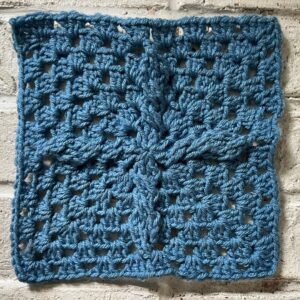
The granny stitch is one of the most iconic crochet stitch patterns. It’s been around for years, and has recently seen a surge in popularity. But somehow, it never seems to completely go out of style. Maybe that’s because there are countless ways to mix it up! The Elizabeth Square combines moss stitch with the traditional granny stitch. Four smaller squares in two different color combos come together to create an eye-catching, one-of-kind granny square.
This post contains affiliate links. While I may receive compensation when you purchase and item from a link, your price doesn’t change and all recommendations are my own. See affiliate disclosure policy.
More Granny Square Blanket Crochet Alongs (CALs)

The Granny Stitch Sampler Blanket CAL
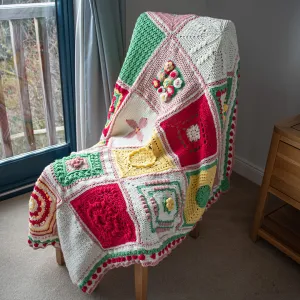
The Elizabeth Moss Stitch Granny Square was featured in the Granny Stitch Sampler Blanket CAL, hosted by MadameStitch in 2024.
12 amazing crochet designers came together to create a stunning blanket made up of 12 unique granny squares! They shared a new granny square pattern every Monday, Wednesday, and Friday throughout October 2024. Crocheters all around the world worked together on this cozy granny stitch blanket.

Click the image below to visit the roundup post and learn more about the CAL.


If you’d like to have the patterns to make the entire Granny Stitch Sampler Blanket, all in one convenient eBook, you can also purchase also the bundle.

The Elizabeth Moss Stitch Granny Square
If you make this pattern be sure to post pictures on social media and tag @juniperandoakes and use the hashtag #juniperandoakes. I would love to see your work!
The pattern is provided free for you on this website further down below, but if you would like a ad-free, printable version of the pattern, you can purchase it for just a few dollars from my shop (you can add it to your Ravelry pattern library from there)! You can also buy the pattern from Ravelry or Etsy, or view it on Gosadi.
Purchase the Pattern from the Juniper & Oakes Shop
Skill Level: Easy
Materials
- Yarn: Medium (4) Worsted Weight yarn
- 145 yards
- Hook: Size 5 mm / H
- Yarn needle
- Scissors
Gauge
Not important for this pattern.
May adjust hook size to meet desired finished measurements.
Finished Measurements
12″ x 12″ square
Stitch Abbreviations (US Terminology)
- ch – Chain
- dc – Double Crochet
- GS – Granny Stitch
- mc – Magic Circle
- ms – Moss Stitch
- sc – Single Crochet
- sl st – Slip Stitch
- sp – Space
- RS – Right Side
- WS – Wrong Side

Special Stitches
Granny Stitch (GS)
3 dc worked in same stitch or space, followed by ch 1
Moss Stitch
Moss Stitch (ms): sc, ch1, sk next st
Pattern Notes
- Ch 1 at the beginning of a round does not count as a stitch.
- Ch 3 at the beginning of a round does count as a dc.
- If you tend to have loose tension when you crochet, you may need to go down a hook size or choose a light worsted weight yarn to make this a 12″ square.
- This 12″ square is made by crocheting 4 smaller 6″ squares and seaming them together.
- Two of my squares are worked up by Alternating Color A & B each round. The other two squares are made up of using only Color A.
- There is a video tutorial for this square. Click here to view.
Video Tutorial
Pattern for the Moss Stitch Granny Square
Make 4, then seam together.
Round 1: Make a mc, ch 3, 2 dc in mc, ch 2, *GS in mc, ch 1, repeat from * 3 times, sl st to top of ch 3 to join. (4 GS total)
Round 2: Turn, ch 3, 2 dc in ch-2 space below, ch 2, *GS in same ch-2 space, GS in next ch-2 space, ch 1, repeat from * 3 times, GS into the same ch-2 space, sl st to top of ch 3 to join. (8 GS total)
Round 3: Turn, ch 1, sc in each st and ch, working [sc, ch 2, sc] in each corner, sl st to top of ch 1 to join. (9 sc per side)
Round 4: Turn, ch 1, ms, around, working [ms, ch 1, ms] in each corner, sl st to top of ch 1 to join. (6 sc per side)
Round 5: Repeat Round 4. (7 sc per side)
Round 6: Repeat Round 4. (8 sc per side)
Round 7: Turn, ch 3, 2 dc in ch-1 space below, ch 1,*sk 1 ch-1 sp, GS in next ch-1 sp, repeat from * around, working [GS, ch1, GS] in each corner. (5 GS per side)
Round 8: Turn, ch 3, 2 dc in ch-1 space below, ch 1, *GS in next ch-1 sp,* around, working [GS, ch1, GS] in each corner. Fasten off. (6 GSper side)
Join 4 Granny Squares Together with Mattress Stitch
- Thread yarn needle with the Color A.
- Line up the 2 edges of the squares, ensuring the corresponding stitches on each square are matched up.
- Starting at the first stitch at the bottom of one square, insert the needle from the WS to RS.
- Find the corresponding stitch of the other square, insert the needle from WS to RS.
- Continue sewing back and forth from the WS to RS between both squares to end.
- When finished sewing first two squares together, continue sewing the other two square together in the same manner.
- Weave in ends.
- With another length of Color A, seam the squares together
horizontally.

The Fine Print
This pattern and its images are the property of Juniper and Oakes ©2024. The pattern is for your personal use only. Please do not copy/paste, distribute, or alter and claim as your own. You may sell products made by this pattern, but please credit @juniperandoakes.
Please post pictures on social media and tag @juniperandoakes and use the hashtag #juniperandoakes. You can also post pictures in the Juniper + Oakes Crochet Community Facebook Page.
Let me know if you run into a problem. I respond quickly and will help any way I can to clarify any confusion or challenging stitches.

Love this Square! So pretty. Thank You for sharing.