Jasmine Stitch Pillow – Free Crochet Pattern – Desert Flower Pillow CAL
Crochet this jasmine stitch pillow with me in this free crochet-along of the Desert Flower Pillow. This is an intermediate crochet pattern that features the Jasmine stitch worked in the rows. Included are written instructions, as well as some videos and pictures to help guide you.
Welcome to the Desert Flower Pillow CAL!
I am your host, Erin of Juniper & Oakes. I am so glad you are here!
Note: Affiliate links are found throughout this post, meaning if you make a purchase after clicking one of those links, I may earn a small commission at no extra cost to you. Thank you for your support! Such purchases help me be able to provide free CALs like this one!
Unable to work up this pattern right now? Pin it for later!


Featured Crochet Stitch: The Jasmine Stitch
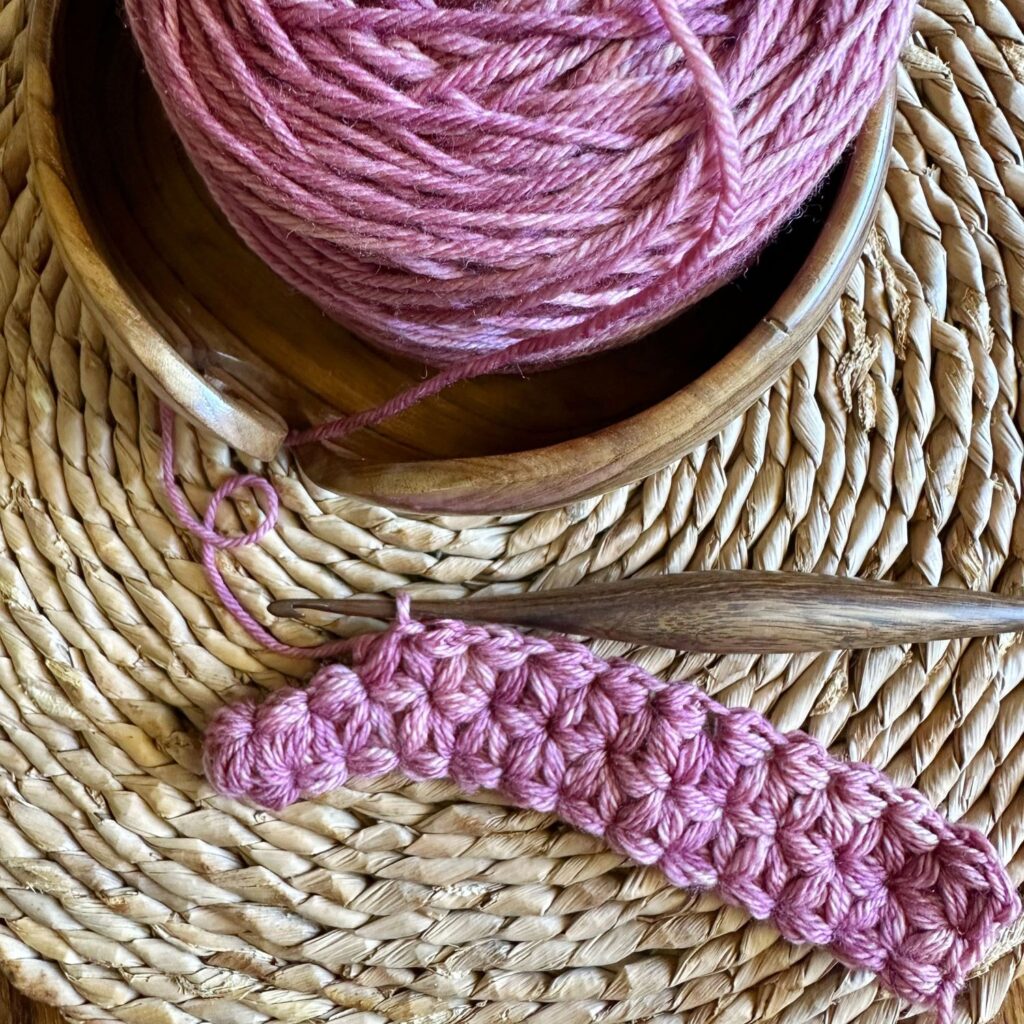
This pillow features the Jasmine Stitch. The Jasmine stitch is relatively new to me. Well, I had seen it around a lot, but didn’t think I was good enough to crochet with it. After seeing the Bento Backpack by Bags by Bento on Instagram, I just knew I had to try it out!
I watched a bunch of tutorials, practiced a lot, and was inspired to create a pillow pattern featuring this stitch, and bippity-boppity-boo! Here is the Desert Flower Pillow!
I created a picture and video tutorial to help guide you in creating this pillow.
Click here for the tutorial on my blog.
What is a CAL?
Perhaps you have never participated in a Crochet Along before and you may be wondering what in the world I am talking about.
A Crochet Along (CAL) is essentially an event where you crochet along with other people creating the same project. Each part of the pattern is released bit by bit and you work at the same pace as other participants.
Here are some examples of other CALs I’ve hosted:
- Bookmark Bonanza CAL
- A Very Bauble Christmas CAL
- Mosaic Nordic CAL
- Nordic C2C CAL
- 4th of July Pillow CAL
- Monthly Mosaic Mystery CAL
- Cozy Alpine Stocking CAL



Details on this CAL
For this CAL, there were 5 sections, with one being released daily over a week. The first section was released a bit early for all of you who gather their supplies ahead of time. The crocheting part commenced from May 15th to May 20th, 2023.
Once you work up the section for the day, be sure you head over to the Juniper & Oakes Crochet Community on FaceBook to share pictures or your WIPS and completed pillows.
Buy the Full Pattern!
This pattern is free below, released section by section over the course of the CAL. The complete pattern will be available for free on the blog beginning Saturday May 20, 2023.
But if you would rather have an ad-free PDF version of the complete written instructions, you can purchase it beforehand.
The Yarn
The yarn used for my pillow is worsted weight yarn from High Desert Yarn in the colorway Malvas for Piper. This is hand-dyed 100% Superwash Merino Wool yarn.
This colorway is specifically designed & dyed up for this pillow CAL (well, initially I had her create this custom colorway in 2022 when I made a romper for my baby Piper, hence the name). “Malvas for Piper” is a gorgeous skein of hand dyed yarn in a varying shades of mauve. This colorway varies in lighter to darker shades of pink-grey purple with a few splashes of deep mauve.
You will need 3 skeins of this yarn. Lucky for you, the dyer Joanna has created kits for you to purchase so it’s easy to gather the supplies you need! (If you are a subscriber to my newsletter check your email for a coupon code to get 10% off your kit. Not a subscriber? It’s not too late!)
Substituting the Yarn:
- If you aren’t a fan of the color pink, don’t let that stop you from trying out High Desert Yarn! Joanna has a variety of other colorways to choose from. Click here to browse. Just note that you will need 3 skeins to make this pillow.
- If you aren’t a fan of hand-dyed yarn for whatever reason (fiber-type, price point, etc). You can use whatever worsted weight yarn that you’d like. You’ll need about 660 yards, depending on gauge/tension/all that. Here are some yarn substitutions you can use:
The Hook
I used a 4mm/G hook for this pattern. I love the Laurel Wooden Streamline hook from Furls Fiberarts. It’s lightweight and works perfectly with this yarn! I love the way this hook feels in my hands.
Note: I have been told that I crochet tightly. You may have to adjust your hook size based on gauge and tension.
Share your work
Since this is a crochet-along, why not share your pillow progress with us? You can share WIPS and finished photos! Get creative! Some ideas of where to share:


- TikTok
- The J&O Crochet Community Facebook Group
- In Ravelry as a project
- On the Ravelry forum for the CAL
- Please include @juniperandoakes #DesertFlowerPillow and links to this page where applicable.
Anyone who shares a Reel on Instagram or TikTok and tags me @juniperandoakes so that I can see it, will get a special gift from me!
Let’s begin!


Part 1: Gather the Materials & Prepare the Yarn.
Watch the video below as I talk about what to do with the hanks of yarn you get from High Desert Yarn. Then you’ll be directed to another video watching me turn my hanks into cakes!
Materials used to wind my yarn:
Featured Stitch: Practice the Jasmine Stitch
The featured stitch in the Desert Flower Pillow is the Jasmine Stitch. This is a seemingly complicated stitch that creates a 6-petal flower, all using puff stitches. I just love it! Once I learned the Jasmine Stitch, I knew I had to create a special pattern to teach it to the rest of you! I will have a picture tutorial on my website. But for now, watch the video above to get a little practice before the CAL begins. You can also click here for a blog post tutorial.
NOTE: This stitch requires a bit of tension to keep the flower shape condensed and elegant with a small hole in the middle of the petals. You may need to take breaks after a few rows and stretch your hands. If you have arthritis, this stitch may be difficult for you.
Part 2: Create Your Gauge Swatch
Watch the video below as I discuss Part 2 of the CAL – creating your gauge swatch. You can then continue down the blog post and read all about the pattern materials, stitches, stitch count for your gauge, etc. Then you can begin crocheting up the gauge swatch for your pillow!
Note: It’s important not to skip this step to ensure your project actually fits the pillow insert you’ve chosen. AND you will use this swatch again for the front panel of the pillow in Part 4.
Part 3: The Pack Panel
Watch as I talk about using the jasmine stitch to create the back panel of the pillow. Since we’re already on a roll with this stitch, I figured we may as well keep going! The CAL is designed to give you 2 days to work up this panel as the stitch can take a while and you may need to take some breaks.
Part 4: The Front Panel
For this part, we grab our gauge swatch from before and make the front panel. Watch the video to learn more then follow the instructions below.
Part 5: Seaming & Embellishments
For the final part, we will be seaming the two panels together, then adding some tassels. Watch the video below to learn more. The seaming instructions are at the end of the video, then you’ll be directed to instructions on making tassels. Enjoy!
Written Instructions: Desert Flower Pillow
Skill Level: Intermediate
Materials
- Yarn: Kaibab worsted, hand-dyed yarn from High Desert Yarn in “Malvas for Piper” 220yds/100g, worsted weight #4 yarn (100% Superwash Merino Wool; 220yds per 100g hank), 660 yards/3 skeins.
- or any other worsted weight yarn
- Hook: G/4.00 mm Laurel Streamline Wood from Furls Fiberarts
- or whichever hook is needed to meet gauge
- Yarn needle
- Scissors
- 12” x 12” Pillow Insert
Gauge
7 ½ stitches x 8 rows = 4” x 4″ square (using Jasmine Stitch – unblocked)
Finished Size
Approximately 12 “ x 12”.
Stitch Abbreviations (US Terminology)
- ch – Chain
- sc – Single Crochet
- sp – Space
- st – Stitch
- yo – Yarn Over
Special Stitches
Puff Stitch (ps):


Lengthen loop to desired length (about ¼-½ inch), yo (keeping the same length for all loops), insert hook into indicated sp, yo, pull up a loop (3 loops on hook), yo, insert hook into same sp, pull up a loop (5 loops on hook), yo, insert hook into same sp, pull up a loop (7 loops on hook), pinch working yarn to secure, yo, pull through all 7 loops on the hook, insert hook into pinched st, yo, pull through both loops on the hook, similar to a slip stitch.
Jasmine Stitch (js):
Lengthen loop to desired length (about ¼-½ inch), yo (keeping the same length for all loops), insert hook into indicated sp, *pull up a loop (3 loops on hook), yo, insert hook into same sp, pull up a loop (5 loops on hook), yo, insert hook into same sp, pull up a loop (7 loops on hook),* yo, insert hook into next space (see images), repeat stitches between *, which adds 6 loops (13 loops on hook), yo, insert hook into next space, repeat stitches between * yet again (19 loops on hook), pinch working yarn to secure, yo, pull through all 19 loops on the hook, insert hook into pinched st, yo, pull through both loops on the hook, similar to a slip stitch.


Modified Moss:
sc in ch-2 sp, ch 2, sc in next ch-2 sp
Pattern Notes
- There is no foundation chain for this pattern, the foundation row is made up of puff stitches.
- Think of the Jasmine stitch like 3-puff-clusters, working an incomplete puff into each of the 3 indicated spaces, then finally pinching the yarn and pulling through all 19 loops.
- Work up two panels (the back panel and the front), and then seam them together to create your pillow. The front panel uses the gauge swatch as the base, and works the modified moss stitch around.
- Keep in mind stitch count on the panels are not the same, so when seaming together, make sure to sc evenly around.
Pattern
Gauge Swatch
Click here to watch my talk about the importance of the gauge swatch as part 2 of the CAL. Click here for a video tutorial.
Row 1: Ch 1, ps into first ch, ch 1, [ps on top of previous puff, ch 1] repeat for a total of 10 puffs.
Row 2: Ps on top of last puff of Row 1, ch 1, js across, turn.
Rows 3-11: Repeat Row 2.
Fasten off.


Note: Check gauge. You should have 7½ js and 8 rows in a 4” x 4” square. This is important so your pillow comes out as 12” x 12”. If you have more sts than needed, grab a bigger hook and try again. If you don’t have enough sts in your swatch, grab a smaller hook and try again.
Back Panel
Watch the video as I talk about Part 3 of the CAL.
Work identically to the gauge swatch, but with 24 puffs in Row 1.
Row 1: Ch 1, ps into first ch, ch 1, [ps in top of previous puff, ch 1] for a total of 24 puffs.
Row 2: Ps on top of last puff of Row 1, ch 1, js across. Turn.
Rows 3-26: Repeat Row 2.
Border: Sc in corner space, ch 2, sc in same space, [ch 2, skip over puff, sc in space between next 2 puffs] repeat around, working each corner as written above, ch 2, sl st to 1 st to join.
Fasten off.
Note: Check fit after 3 rows. Does your work fit across your pillow? If not, start again. Use a different hook size or use a different number of puff stitches in Row 1. Another option is to use a different size pillow insert to match the size of your cover.


Front Panel
Round 1: Attach yarn to the gauge swatch to the space before the last puff of the top row, sc in that space, ch 2, skip over puff, sc in corner space, ch 2, sc in same corner space, [ch 2, skip over puff, sc in space between next 2 puffs], repeat around, working each corner as written above, ch 2, sl st to 1st sc to join.
Round 2: Ch 2, modified moss stitch around, working [sc, ch 2] x2 into each corner. After final sc of round, ch 1, sl st to first ch of the round.
Round 3-19: Repeat Round 2
Do not fasten off. Continue to seaming.
Seaming
Seam the two panels together:
- Sc evenly along 3 sides. In each corner work 3 sc.
- Insert pillow.
- Continue on the fourth side with a sc in each st.
- Sl st to join.
- Fasten off and weave in all ends.
Embellishments
Add a tassel to each corner as described in this tutorial.
Don’t like the ads?
The complete, ad-free, printable pattern is available for sale directly from me, or on Etsy and Ravelry.
Note: If you purchase from Etsy or Ravelry, please email me so you still get the invitations to the Sip & Stitches.
The Fine Print
This pattern and its images are the property of Juniper and Oakes ©2023. The pattern is for your personal use only. Please do not copy/paste, distribute, or alter and claim as your own. You may sell products made by this pattern, but please credit @juniperandoakes and remember to link back to juniperandoakes.com or credit Juniper & Oakes on the craft fair tag.
You may post pictures on social media and tag @juniperandoakes and use the hashtags #juniperandoakes and #jaobookmark. If you make this pattern, please email a picture to [email protected] and I will include it in a gallery on my website.You can also post pictures on my Facebook Page, or in the Juniper + Oakes Crochet Community Facebook Group.
Let me know if you run into a problem. I respond quickly and will help any way I can to clarify any confusion or challenging stitches.


