Striped Crochet Envelope Border for a Mosaic Blanket – Christmas in July CAL
Mosaic crochet allows you to create all sorts of intricate-looking designs, using just one color per row. The downside to changing colors each row is you’re left with dozens of ends down each side. But when you use this crochet envelope border for a mosaic blanket, the ends are not a problem! You can breathe a sigh of relief because all of your ends will be hidden inside this border to give you a neat finish without hours of weaving. 🎉
You can use this envelope border (sometimes called a double border) on any mosaic crochet project, from blankets, to scarves, to potholders. But it was originally designed as part of the Christmas in July CAL. Even though the CAL ends with this border, the patterns will still be available on the designers’ websites. So you can still crochet a gorgeous holiday blanket that you can use and love for years to come!
If you’re making the Christmas in July Blanket, this border will finish your blanket and tuck your ends away neatly!


The Christmas in July CAL
Welcome the Christmas in July CAL! If you are just joining in, the main CAL post covers everything in detail.
But here’s a quick rundown: Together, we crocheted an heirloom Christmas blanket over in the Juniper & Oakes Crochet Community FB Group. Each Friday and Tuesday from July 1st through July 25th, 2025, 8 crochet designers (including me!) released a new free blanket section. These patterns and mosaic charts are still available on the designers’ blogs, and you can find links to each free pattern here! The last part is this pattern, which teaches you how to crochet a striped envelope border for your blanket.
This multi-color envelope border puts a clean finish on a festive holiday blanket that includes 8 Christmassy mosaic crochet designs. We made this blanket throughout July 2025 and it all comes together now!
If you hate weaving in ends, this border is the perfect solution for you! But there are lots of other options for mosaic crochet edgings. You could simply trim the ends even to make a fringe. Or try one of these other border ideas:
- Twisted fringe
- Envelope Border using HDC
- Checkered Mosaic Envelope Border (with photo crochet tutorial)
No matter which way you go with your border, pat yourself on the back because you finished your blanket! 🎉 Thank you so much for creating this blanket.
I know it felt like a labor of love & I hope you loved the process!
This post contains affiliate links. While I may receive compensation when you purchase and item from a link, your price doesn’t change and all recommendations are my own. See affiliate disclosure policy.
Can’t work this pattern right now? Pin it for later!

After grabbing this crochet border pattern, make sure you head on over to the Juniper & Oakes Crochet Community. You can ask questions and share pictures of your WIPs and finished blanket. It will be a lot of fun!
If you don’t have Facebook, you can still participate in the CAL by creating your blanket stripes and border on your own. Definitely post pictures and share about the CAL on any social media you have. Be sure to tag me @juniperandoakes and use #XMASINJULYMOSAICCAL so we can see your progress.

Don’t miss an update
I will be sending out an email each time a new design is released. You will be the first to be notified of the next part of the CAL or any other news. Sign up now!
Instructions for the Crochet Envelope Blanket Border
Skill Level: Adventurous Beginner/Intermediate
Gauge for the Blanket
18 stitches x 18 rows = 4” x 4” in square
A swatch of the pattern
Size:
Approximately 45” x 50” (the full blanket)
How big will This Blanket be?
The answer depends on many factors: yarn, hook, tension, etc. If you work a gauge swatch in the pattern stitch and measure it, you can multiply that out to estimate the finished size of your blanket. Mine started with a foundation row of 195 stitches came out about 45″ x 50″.
Stitch Abbreviations (US Terminology)
- HDC – Half Double Crochet
- BLOHDC – Back Loop Only Half Double Crochet
- ch – Chain
- FLO – Front Loop Only
- RS – Right Side
- sc – Single Crochet
about Crochet Envelope Borders
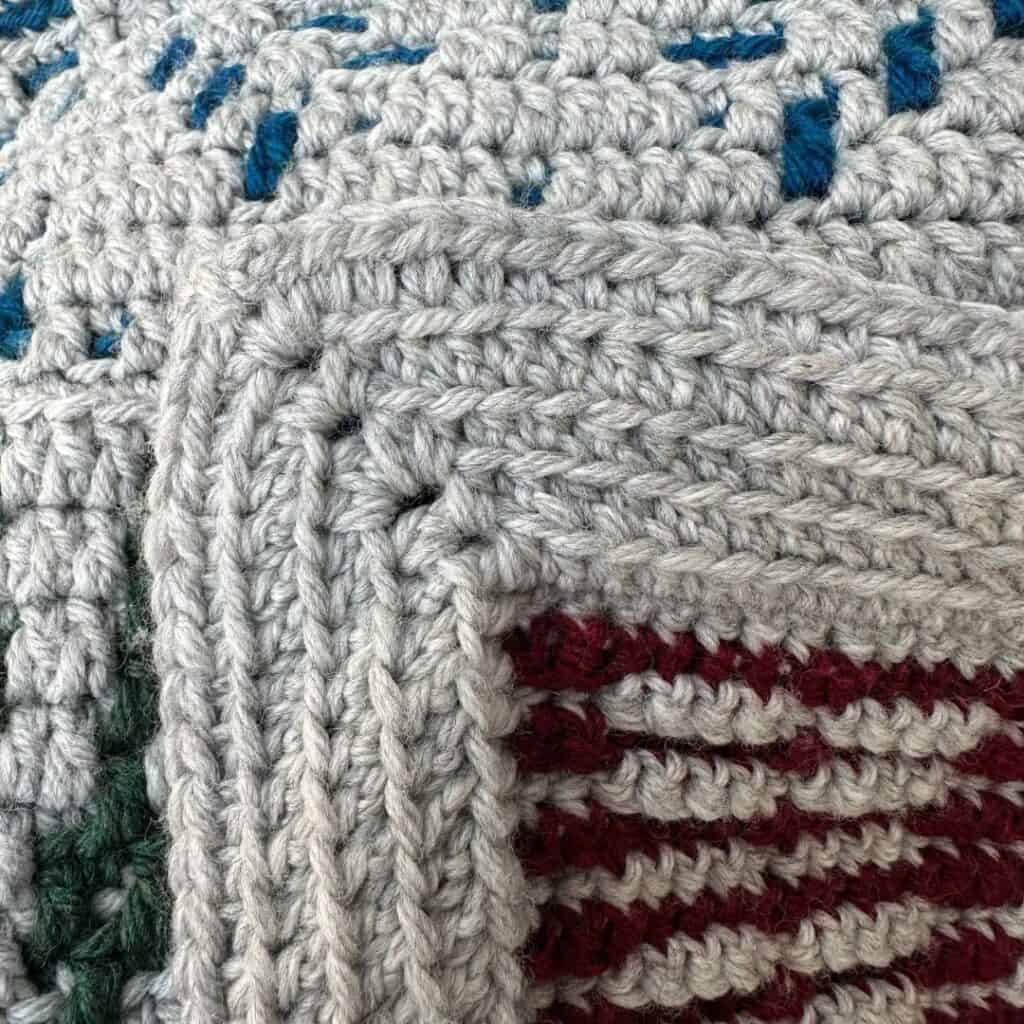
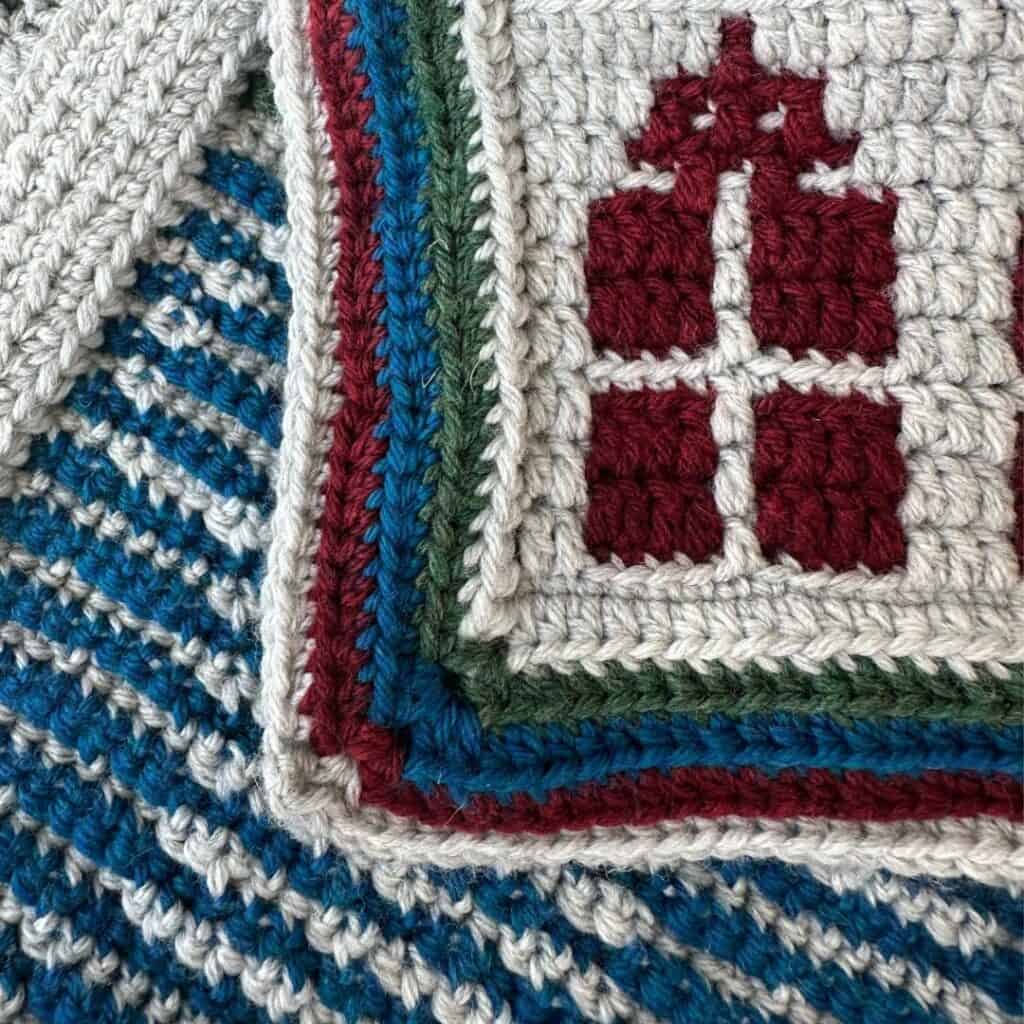
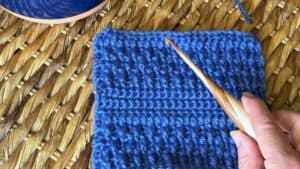
Most overlay mosaic crochet designs (unless they are small or are worked in the round) utilize an double/envelope border to hide all of the ends that result in fastening off at the end of each round. You work a border on the back side, then a border on the front side, and seam them together, ensuring all ends are enclosed inside.
To get a better idea of the concept, I’ve provided a video tutorial below.
Notes
- Please join the Juniper & Oakes Crochet Community FB Group and share pictures and questions that arise.
The Yarn: DK
KnitPicks Swish DK, #3 yarn (100% Fine Superwash Merino Wool; 123 y/112 m per 1.75 oz/50 g skein) or your favorite DK yarn in four colors.
- Color A – Dove Heather (gray)
- Color B – Garnet Heather (red)
- Color C – Forest Heather (green)
- Color D – Marine Heather (blue)
Swish is a 100% Fine Superwash Merino Wool that’s super soft and machine washable!
The Hook: 5mm
I used an H/5.00 mm hook for this blanket. I love the Streamline Metal Crochet Hooks from Furls Crochet. These hooks are perfectly shaped to fit in my hand and have a great weight to them. If you have never tried a Furls hook, I highly recommend that head on over to their website and order one now.
Of course, these hook sizes are just my preference. Use whatever hook you’re comfortable using with the yarn of your choice. Just be aware that this may change the size of your blanket. So be sure to make a swatch using the yarn and hook you want to use. Then multiply it by the number of stitches so you will have a better idea how big your blanket will be.
This striped envelope border was designed in four colors—gray, red, green, and blue—which were also used for the body of the blanket. But if you want to use creative license to create a new color combo, I won’t be offended. I love seeing what color schemes everyone comes up with! You could use a neutral color or something that contrasts the colors of the blanket and makes it pop. Whatever you choose, make sure to share your blanket on the FB group so we can all see and be inspired by your creativity!
pattern for the Crochet Envelope Border
Back Border
Round 1: With Color A, HDC in the FLO of any stitch along the bottom of blanket, HDC in FLO in each stitch. In each corner, *HDC in FLO, ch 2, HDC in FLO*. Along the side, HDC through both legs of the border stitches. Invisible join to 1st stitch. (see below)

Round 2: Ch 1, BLOHDC in each stitch around. In each corner ch-2 space, *BLOHDC, ch 2, BLOHDC* in each corner. Invisible join to 1st stitch.
Rounds 3-5: Repeat Round 2
Invisible Join

- Work last stitch
- Remove hook from loop.
- Insert hook through back of 1st stitch of row
- Grab dropped loop
- Pull yarn loop though.
- untangle hook & yarn.
Front Border
Rounds 1-4: Repeat from Back Border, changing colors each round Starting with Color A, followed by Colors B, C, D, and ending with Color A.

Finishing
- Secure ends by tying two together along each side.
- Trim ends to about 1inch in length.
- With Color C, BLOHDC through BOTH borders. (The loops that are closest together on the blanket), ensuring that the ends are enclosed in the envelope border.
- Fasten off.
- Weave in (or hide) all ends.
Action Items:
Add the Envelope Border to your crochet Christmas blanket.
Post a picture of your finished section in the J&O FB Group (please use #XMASINJULYMOSAICCAL so I can easily find it)
- Post a picture/video/Reel on all the social media and tag @juniperandoakes and use #XMASINJULYMOSAICCAL
Visit the CAL page to find links for the rest of the Christmas in July Blanket.
OR purchase the ebook to get the complete pattern all at once
If you have any issues, questions, or tips, please post them on the J&O FB Group

The Fine Print
This pattern and its images are the property of Juniper and Oakes ©2025. The pattern is for your personal use only. Please do not copy/paste, distribute, or alter and claim as your own. You may sell products made by this pattern, but please credit @juniperandoakes and remember to link back to juniperandoakes.com or credit Juniper & Oakes on the craft fair tag.
If you make this pattern, please email a picture to [email protected] and I will include it in a gallery on my website.You may post pictures on social media and tag @juniperandoakes and use the hashtag #juniperandoakes and #XMASINJULYMOSAICCAL. You can also post pictures on my Facebook Page, or in the Juniper + Oakes Crochet Community Facebook Group.
Let me know if you run into a problem. I respond quickly and will help any way I can to clarify any confusion or challenging stitches.


I love this video. You made it so clear and easy to follow. Thank you so much.
I am trying my first mosaic and don’t know how to leave my end of the row yarn so that it will stay and not come apart leaving some fringe, can you help?