Free Crochet Envelope Border Pattern – Easily hide Your Ends!
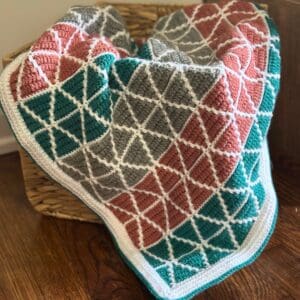
You’ve worked for weeks (or months) on a beautiful mosaic crochet blanket. Now, you’re left with a ton of yarn ends along each edge. If you’re filled with dread at the thought of weaving in your ends, don’t worry! With just a few easy rounds, you can hide all of those pesky ends inside of a crochet envelope border.
This border was designed as part of the Gingerbread Mosaic Blanket CAL. But you can use this
If you’re making the Gingerbread Mosaic Blanket, congratulations! You made it. Once you finish this part of the CAL, your afghan will be complete.


You’ve finally reached the end of the Gingerbread Mosaic Blanket CAL! If you’ve just found the CAL, that’s OK! All of the patterns for this mosaic crochet blanket will remain free on my blog, so you can make it whenever you like. To learn more about the Gingerbread CAL, read this post.
But I’ll go ahead and give you the basics here. We all crocheted an heirloom Christmas blanket together over in the Juniper & Oakes Crochet Community FB Group. Each Monday from September 16th through December 2nd, 2024, a new free blanket section pattern and chart was released right here on my blog, and this is the last one.
You’ll finish off your Gingerbread Mosaic Blanket with this crochet envelope border. We combined and remixed 5 designs to make this gorgeous Christmas afghan during Fall 2024!
Now, you’ll pull the whole thing together with this beautiful and functional border. Basically, you’ll crochet a front border and a back border, then crochet the two borders together, tucking all of your yarn ends neatly inside. No weaving required!
This post contains affiliate links. While I may receive compensation when you purchase and item from a link, your price doesn’t change and all recommendations are my own. See affiliate disclosure policy.
Can’t work this pattern right now? Pin it for later!

After grabbing the free crochet pattern, make sure you head on over to the Juniper & Oakes Crochet Community. You can ask questions, share pictures of your WIPs and finished sections, enter to win the giveaway prize, watch Live videos, and join our virtual Sip & Stitch. It will be a lot of fun!
If you don’t have Facebook, you can still participate in the CAL by creating your blanket stripes on your own. Definitely post pictures and share about the CAL on any social media you have. Be sure to tag me @juniperandoakes and use #GingerbreadCAL so we can see your progress.

Don’t miss an update
I will be sending out an email each time a new design is released. You will be the first to be notified of the next part of the CAL or any other news. Sign up now!

Instructions for Crochet envelope Border
Skill Level: Adventurous Beginner/Intermediate
Gauge for the Blanket
18 stitches x 22 rows = 4” x 4” in square
A swatch of the pattern. Counted on the WS.
Size:
Approximately 45” x 58” (the full blanket)
Video Tutorial for a Similar Crochet Envelope Border
Stitch Abbreviations (US Terminology)
- sc – Single Crochet
- FLO – Front Loop Only
- BLOsc – Back Loop Only Single Crochet
- BLOdc – Back Loop Only Double Crochet
- ch – Chain
- dc – Double Crochet
- RS – Right Side
Special Stitches
sc in FLO
Insert hook in front loop of indicated st, yo and pull up a lp, yo and draw through both lps on hook.
Back Loop Only Single Crochet (BLOsc)
Insert hook in back loop of indicated st, yo and pull up a lp, yo and draw through both lps on hook.
Back Loop Only Double Crochet (BLOdc)
Yo, insert hook in back loop of indicated st, yo and pull up a lp, yo and draw through two lps on hook, yo and draw through remaining two lps on hook.
Notes
- The pattern includes a photo tutorial and written instructions below. You may want to refer to each.
- The pattern can be worked up in any colors you want (or even a single color). Simply ignore any other color changes and change whenever you like.
- Please join the Juniper & Oakes Crochet Community FB Group and share pictures and questions that arise.
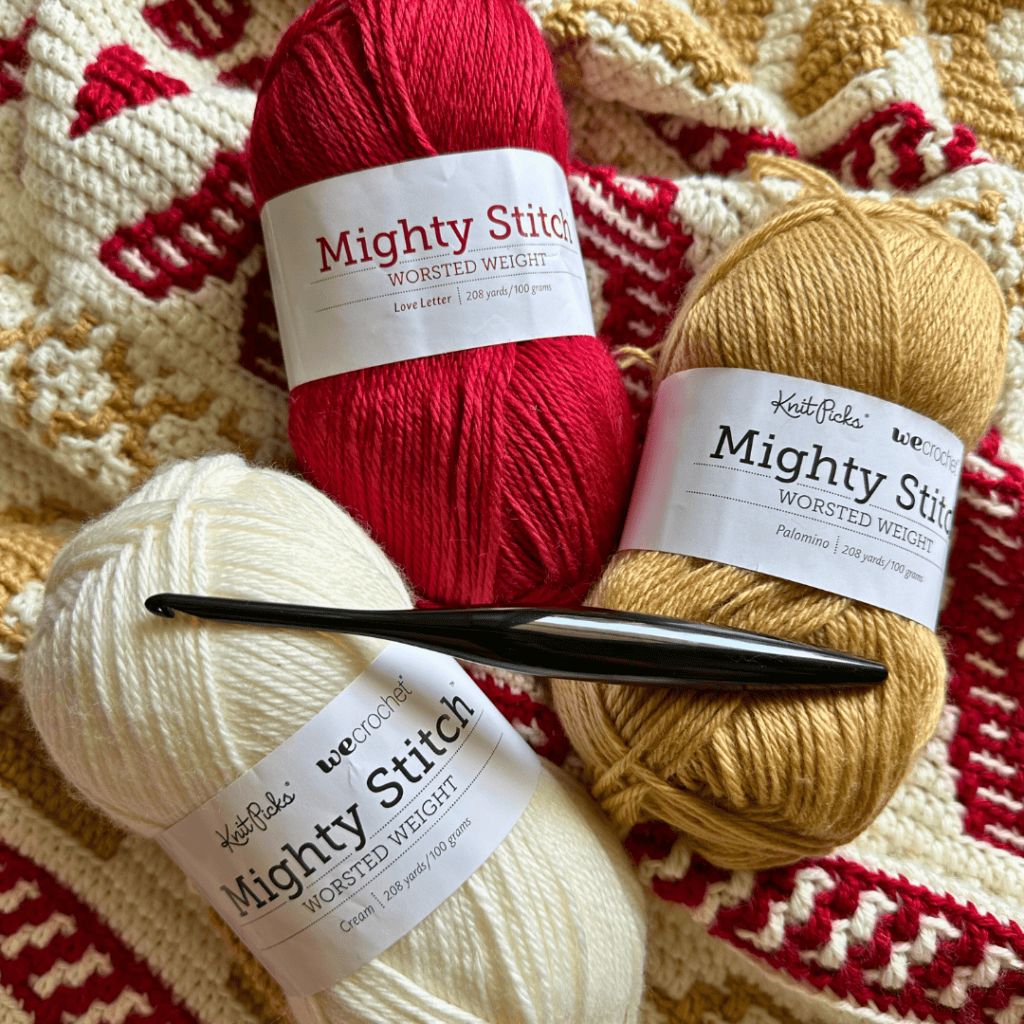
The Yarn: Worsted
WeCrochet Mighty Stitch (208y, 100g, 20% Superwash Wool/80% Acrylic) or other worsted weight yarn in two colors
- Color A: Cream
- Color B: Palomino
- Color C: Love Letter
WeCrochet Migthy Stitch is an affordable worsted weight wool/acrylic blend. It’s super soft, warm, and easy to care for! You can machine wash and dry it, which means you can keep your heirloom blanket looking like new for years!
The Hook: 4mm
I used a G/4.00 mm hook to make my blanket. I love this Gemini Streamline Zodiac Crochet Hook from Furls Crochet. The hook is perfectly shaped to fit in my hand and it has a great weight to it. If you have never tried a Furls hook, I highly recommend that head on over to their website and order one now.
I prefer to use a G hook for this project. But everyone crochets a little differently. So feel free to use whatever hook you’re comfortable using with the yarn of your choice. Just be aware that this affect the tension and size of your border.
This border was designed in three colors—cream, tan, and red—which were used throughout the rest of the Gingerbread Mosaic Blanket. But I’m not offended when people come up with their own color schemes. In fact, I actually loving seeing what you create. Perhaps you’d rather bring in other Christmas colors, like green or gold. Or maybe you want to use another contrasting color to really make the blanket pop. Be sure to share your color combos on the FB group so we can all see what you came up with!
The amount of yarn you will need depends on different factors like yarn weight, hook size, and tension. With the recommended yarn and hook, you will use approximately 2325 yards of Cream, 1290 yards of Palomino (warm golden tan), and 975 yards of Love Letter (deep red) to make the full Gingerbread Mosaic Blanket. Plus you’ll need a little extra of each color for the border.
Watch this video on a simple envelope border.
Please note that the video above is for a simple envelope border. For the Gingerbread Blanket border, follow the steps for the first round of each side, then be sure to follow the written instructions for using a BLOdc (back loop only DOUBLE CROCHET) for some added texture and dimension.
Pattern for the Crochet Envelope Border
Back Border
Round 1: With Color C, sc in the FLO of any stitch along the bottom of blanket, sc in FLO in each stitch. In each corner, *sc in FLO, ch 2, sc in FLO*. Along the side, sc through both legs of the border stitches. Invisible join to 1st stitch. (see below)

Round 2: With Color A, Ch 1, BLOsc in each stitch around. In each corner ch-2 space, *BLOsc, ch 2, BLOsc* in each corner. Invisible join to 1st stitch.
Round 3: With Color B, Ch 1, BLOdc in each stitch around. In each corner ch-2 space, *BLOdc, ch2, BLOdc* in each corner. Invisible join to 1st stitch.
Round 4: With Color A, Repeat Round 2

Invisible Join

- Work last stitch
- Remove hook from loop.
- Insert hook through back of 1st stitch of row
- Grab dropped loop
- Pull yarn loop though.
- Untangle hook & yarn.
Front Border
Rounds 1-4: Repeat from Back Border.

Finishing
- Secure ends by tying two together along each side.
- Trim ends to about 1 inch in length.
- With Color C, BLOsc through BOTH borders. (The loops that are closest together on the blanket), ensuring that the ends are enclosed in the envelope border.
- Fasten off.
- Weave in (or hide) all ends.

Thank you so much for crocheting with me.
I know it felt like a labor of love & I hope you loved the process!
If you would prefer not to jump from one blog post to the next, you can purchase the full ebook. The PDF includes all the charts and written instructions for each blanket section, all in one convenient place. An added benefit of purchasing the ebook is you have the pattern for the whole blanket all at once and do not have to wait for the new design to be released!
Ready, Set… CROCHET!
Action Items:
Work the Envelope Border around your Mosaic Gingerbread Blanket
Post a picture of your finished blanket in the J&O FB Group
Relax and enjoy your holiday with your very own mosaic crochet Christmas blanket!
OR give it away as a cherished gift to a loved one
- Want to make this mosaic crochet blanket again? Purchase the ebook to get the complete pattern to keep, all in one convenient PDF
If you have any issues, questions, or tips, please post them on the J&O FB Group

The Fine Print
This pattern and its images are the property of Juniper and Oakes ©2024. The pattern is for your personal use only. Please do not copy/paste, distribute, or alter and claim as your own. You may sell products made by this pattern, but please credit @juniperandoakes and remember to link back to juniperandoakes.com or credit Juniper & Oakes on the craft fair tag.
If you make this pattern, please email a picture to [email protected] and I will include it in a gallery on my website.You may post pictures on social media and tag @juniperandoakes and use the hashtag #juniperandoakes and #GingerbreadCAL. You can also post pictures on my Facebook Page, or in the Juniper + Oakes Crochet Community Facebook Group.
Let me know if you run into a problem. I respond quickly and will help any way I can to clarify any confusion or challenging stitches.