Peaks & Pillars Mosaic Afghan Strip – Friends Around the World CAL
Have you ever crocheted a mosaic pattern?
I had never done one until I designed this Peaks & Pillars afghan strip for the Friends Around the World CAL. A designer friend of mine asked if I was interested in giving it a shot, and I never like to turn down a challenge. Seriously, in high school and college I had a special week called ‘Doyle Does Your Dare’ where I accepted any dare that my friends would give me (Doyle is my maiden name).
I have since turned this simple afghan square into a trivet pattern and pillow pattern. And I have many more mosaic patterns in my head! I just need to turn those ideas into yarn and put them to paper for the crochetverse to enjoy!
This post contains affiliate links. While I may receive compensation when you purchase and item from a link, your price doesn’t change and all recommendations are my own. See affiliate disclosure policy.
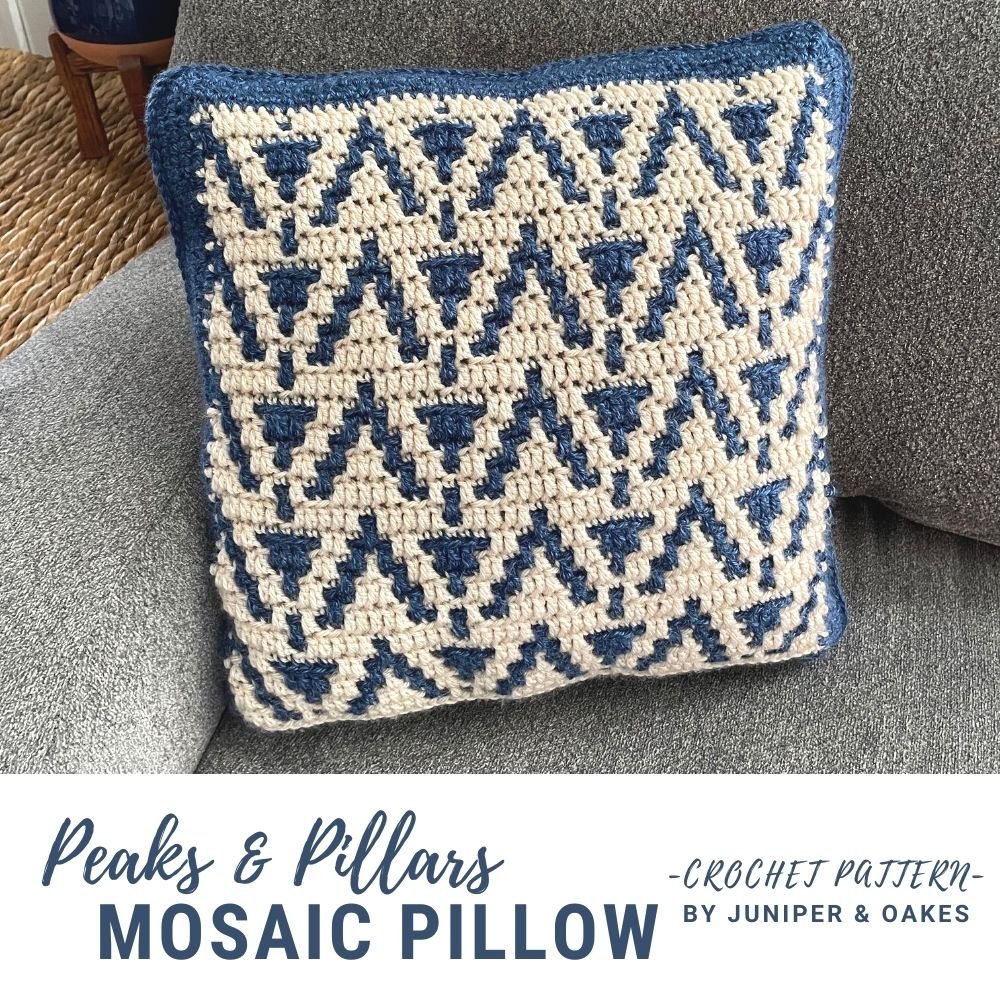

The Peaks & Pillars Pillow
If you’re interested in working up this pattern into a pillow, click here to see my post about the Peaks & Pillars Mosaic Pillow Pattern.
Don’t have time to work this pattern now? Pin it for later.

This pattern is offered for free below, you can also choose to get a downloadable pdf from Ravelry.
Peaks & Pillars Mosaic Afghan Strip for FATW6 CAL
A section from: Friends Around the World 6th Anniversary CAL (FATW6) “Adventures in Mosaic Crochet” is hosted by CAL – Crochet A Long. Links to all past and future patterns can be found on CAL – Crochet A Long’s blog.
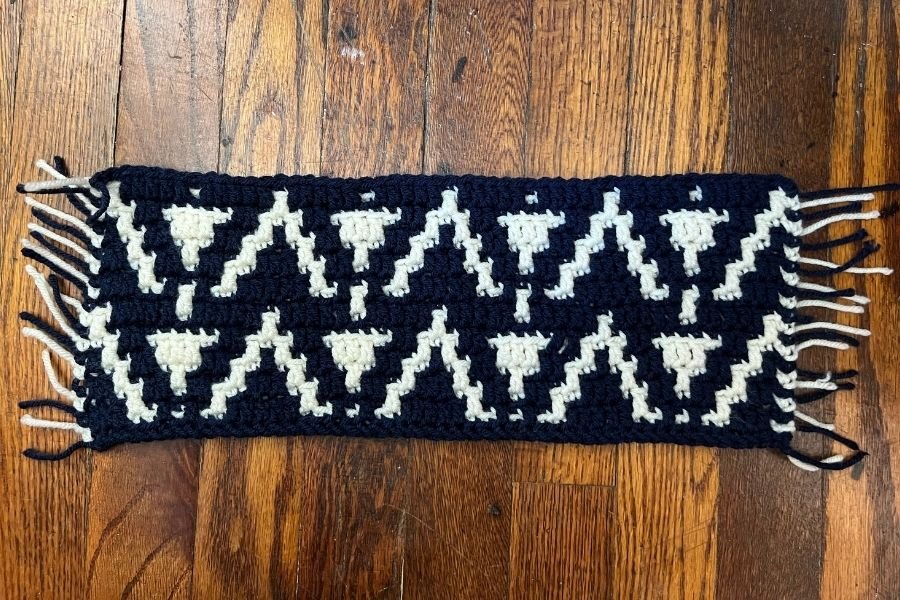
The Peaks & Pillars Mosaic Afghan Strip is a beginner-friendly overlay mosaic crochet pattern. I am a hiker who loves the mountains, so I wanted to design something with a mountain feel. As this was my first mosaic crochet pattern, it needed to be simple yet detailed because I have yet to design anything too straightforward.
If you work up with pattern, PLEASE post pictures on social media and tag @juniperandoakes and use the hashtags #juniperandoakes and #jaomosaic and #peaksandpillars. (You can also post pictures on my Facebook Page, or in the Juniper + Oakes Crochet Community Facebook Group.)
Skill Level: Intermediate (Easy as far as mosaic crochet)
Materials
Yarn: Worsted (4)
Color A: appx 50 yards
Color B: appx 50 yards
Hook H/8 – 5.0mm
Scissors
Gauge
14 stitches x 15 rows = 4” x 4” in square
Finished Size
One 48+3 stitch strip is approximately 16” x 5 ½”.
Stitch Abbreviations (US Terminology)
BLOsc – Back Loop Only Single Crochet
ch – Chain
dc – Double Crochet
FLOdc – Front Loop Only Double Crochet
Fsc – Foundation single crochet
RS – Right Side
sc – Single Crochet
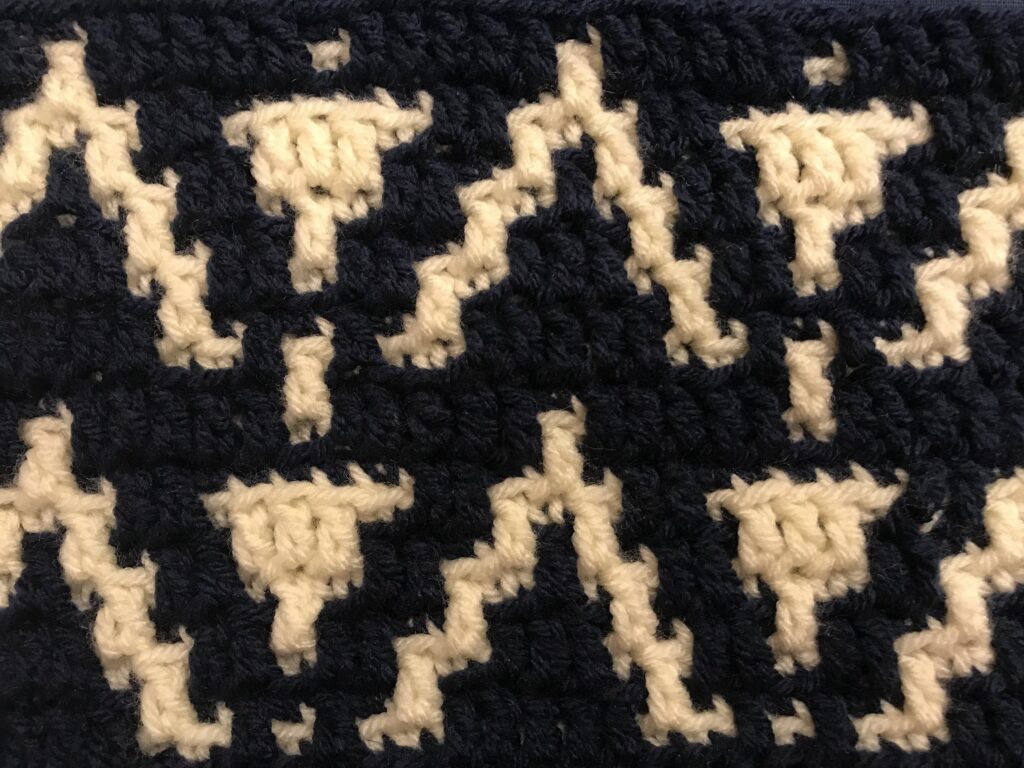

Special Stitches
Overlay Mosaic Technique
If unfamiliar, be sure to watch my video for the pattern. Other recommended resources: Tinna & Daisy Knots.
Fsc – Foundation single crochet
Used in the place of a row of chains and a second row of single crochet. With FSC, you work the chain and your first row of single crochets in one step.
Ch 2.
Insert hook into 1st ch.
Yarn over & pull up one loop.
Yarn over & pull through one loop (Counts as the ch).
Yarn over & pull through boths loops (counts as the sc).
The first Fsc is completed.
Insert hook into ch from step 4.
Repeat steps 3-5.
The second Fsc is complete.
Repeat as many times as necessary to reach the number of stitches needed for pattern.
Click here for a video tutorial. (or you can simply watch below)
Please SUBSCRIBE to my channel, comment that you joined in from the FATW6 CAL, and like the video. Thank you so much!
Pattern Notes
US Terminology
Ch 1 does not count as a stitch.
This pattern uses the overlay mosaic technique. If unfamiliar, be sure to watch my video tutorial (also refer to Tinna & Daisy Knots, as they are my mosaic crochet gurus).
Pattern is worked from right to left on Right Side only.
Every row is worked in a different color.
Fasten off at the end of each row.
Every row begins with a sc through both loops as a “border” stitch.
Every row ends with a sc through both loops as a “border” stitch.
SC are worked in BL only of previous row.
DC are worked in FL only of stitch 2 rows below, skipping the stitch behind unless otherwise noted.
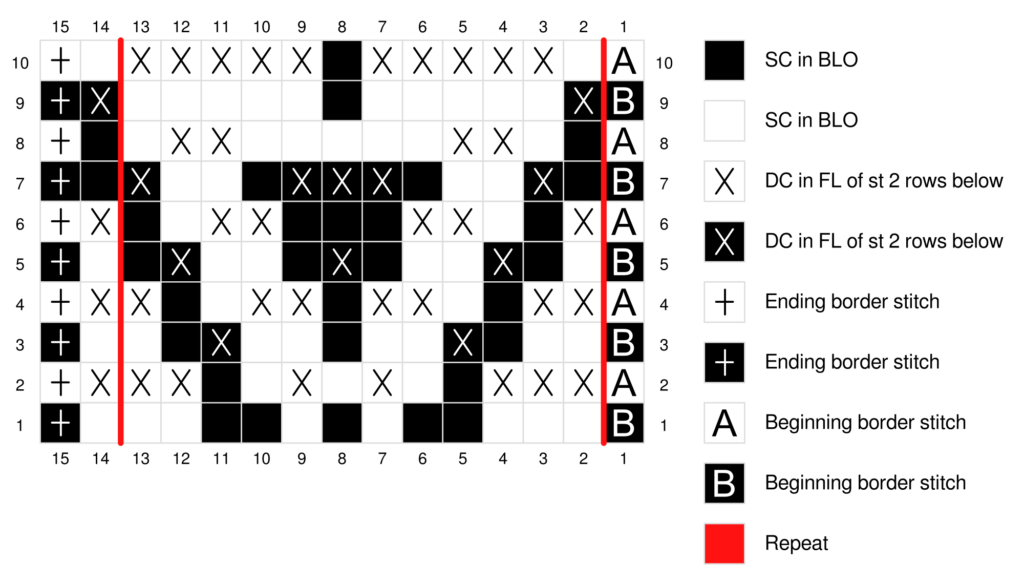
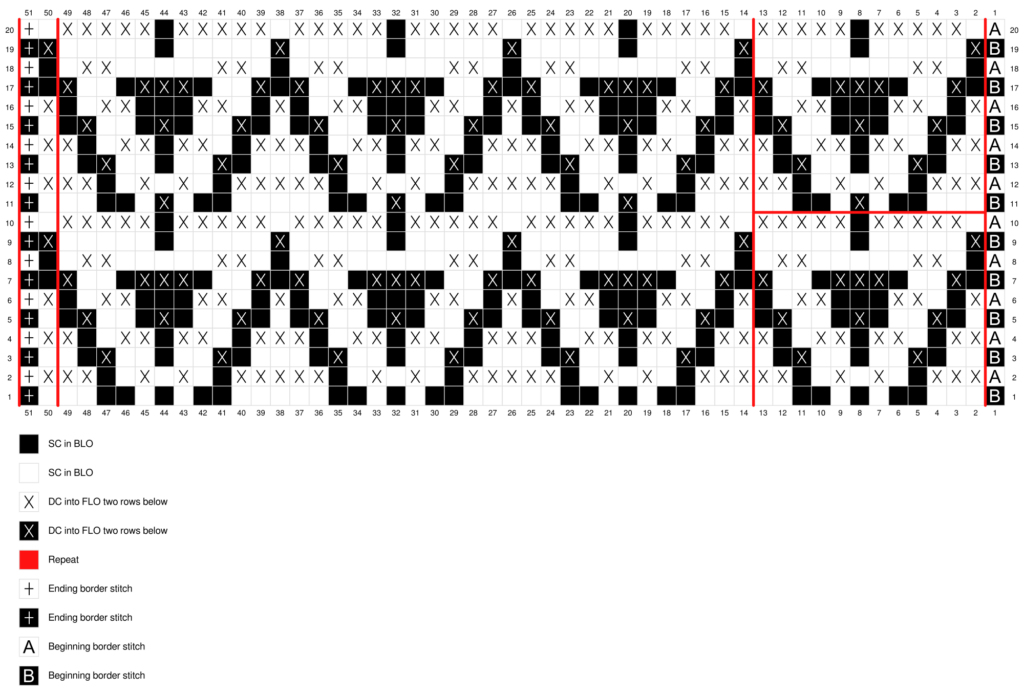
Pattern begins with 1 border stitch, has a repeat of 12 stitches, 1 stitch to even out the pattern, and 1 border stitch at the end.
You may choose to repeat the pattern as many times as you wish. Make sure your Foundation Row is made up of any multiple of 12 plus 3 extra stitches.
You may choose to make your Foundation Row the traditional way by chaining, then adding your sc on top. Be sure to make one additional chain than the number of stitches needed for your project.
This pattern includes a chart, a video, and written instructions. You may want to refer to each. (Charts for 48 + 3 stitches AND the simpler 12+3 repeat included).
- Here is the link to the video tutorial for this pattern (or you can simply watch below)
*Note: the video walks you through my Trivet pattern, which is the same pattern, but just fewer stitches per row. and I added on envelope border to each side to cover the ends.*
Please SUBSCRIBE to my channel, comment that you joined in from the FATW6 CAL, and like the video. Thank you so much!
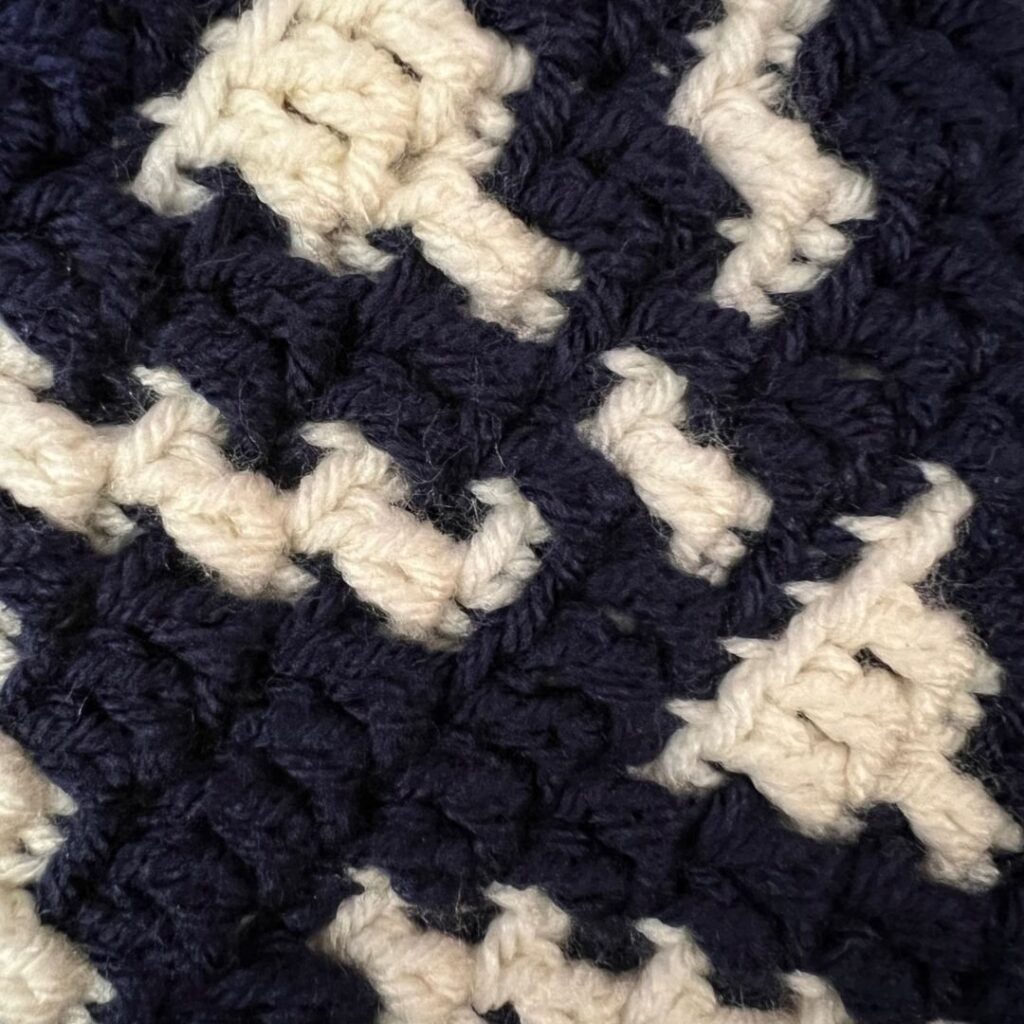

Charts
Foundation of 12+3

Foundation of 48+3

Remember, you can purchase this pattern for just $2 on Ravelry.
Instructions
Foundation Row: With Color A, Fsc 51 (or a multiple of 12 + 3 sts). (skip if adding this strip on to a previous foundation)
Row 1: With Color B, ch 1, sc, BLOsc across the row, sc in last st.
Row 2: With Color A: ch 1, sc, *FLOdc in next 3 sts, BLOsc in next 2 sts, FLOdc, BLOsc, FLOdc, BLOsc in next 2 sts, FLOdc in next 2 sts*, repeat across, FLOdc, sc in last st.
Row 3: With Color B: ch 1, sc, *BLOsc in next 3 sts, FLOdc, BLOsc in next 5 sts, FLOdc, BLOsc in next 2 sts*, repeat across, BLOsc, sc in last st.
Row 4: With Color A: ch 1, sc, *FLOdc in next 2 sts, BLOsc in next 2 sts, FLOdc in next 2 sts, BLOsc, FLOdc in next 2 sts, BLOsc in next 2 sts, FLOdc*, repeat across, FLOdc, sc in last st.
Row 5: With Color B: ch 1, sc, *BLOsc in next 2 sts, FLOdc, BLOsc in next 3 sts, FLOdc, BLOsc in next 3 sts, FLOdc, BLOsc*, repeat across, BLOsc, sc in last st.
Row 6: With Color A: ch 1, sc, *FLOdc, BLOsc in next 2 sts, FLOdc in next 2 sts, BLOsc in next 3 sts, FLOdc in next 2 sts, BLOsc in next 2 sts*, repeat across, FLOdc, sc in last st.
Row 7: With Color B: ch 1, sc, *BLOsc, FLOdc, BLOsc in next 3 sts, FLOdc in next 3 sts, BLOsc in next 3 sts, FLOdc*, repeat across, BLOsc, sc in last st.
Row 8: With Color A: ch 1, sc, *BLOsc in next 2 sts, FLOdc in next 2 sts, BLOsc in next 5 sts, FLOdc in next 2 sts, BLOsc*, repeat across, BLOsc, sc in last st.
Row 9: With Color B: ch 1, sc, *FLOdc, BLOsc in next 11 sts*, repeat across, FLOdc, sc in last st.
Row 10: With Color A: ch 1, sc, *BLOsc, FLOdc in next 5 sts, BLOsc, FLOdc in next 5 sts* repeat across, BLOsc, sc in last st.
Row 11: With Color B: ch 1, sc *BLOsc in next 6 sts, FLOdc, BLOsc in next 5 sts*, repeat across, BLOsc, sc in last st.
Rows 12-20+: Repeat Rows 2-11, being sure to end on a Row 10 repeat.
The Fine Print
This pattern and its images are the property of the Juniper and Oakes ©2021. The pattern is for your personal use only. Please do not copy/paste, distribute, or alter and claim as your own.
You may sell products made by this pattern, but please credit @juniperandoakes and link back to juniperandoakes.com or credit Juniper & Oakes on the craft fair tag.
If you make this pattern, please email a picture to [email protected] and I will include it in a gallery on my website. You may post pictures on social media and tag @juniperandoakes and use the hashtags #juniperandoakes and #jaomosaic and #peaksandpillars. You can also post pictures on my Facebook Page, or in the Juniper + Oakes Crochet Community Facebook Group.
I would love for this pattern to be included in your round-up. Please ask for my permission to use a photo, and please link back to this post. Also, share the link to your round-up post with me so I can promote it as well. Thank you!
Let me know if you run into a problem. I respond quickly and will help any way I can to clarify any confusion or challenging stitches.

